Tips for Photographing Wildlife: Capture Stunning Safari Images
Applying a Wildlife photography tips guide will transform your safari photos from snapshots to stunning images worthy of framing. Wildlife photography in East Africa presents unique challenges and opportunities. This comprehensive Wildlife photography tips guide covers camera gear, settings, composition, lighting, and ethical considerations for photographing gorillas, lions, elephants, and the wildebeest migration.
Essential Camera Gear for Safari
The right gear is the foundation of any Wildlife photography tips guide. Here is what you need:
Camera Bodies
Any modern DSLR or mirrorless camera can produce excellent safari photos. Crop sensor cameras (APS C) actually offer an advantage because they give you extra reach with your telephoto lens. Consider bringing a second camera body as a backup and to avoid changing lenses in dusty conditions.
Lenses
- Telephoto lens (200 to 400mm): This is your most important lens for wildlife photography. A 100-400mm zoom is versatile and excellent for most situations. For gorilla trekking, a 70-200mm or 100-400mm is ideal.
- Wide angle lens (16 to 35mm): Useful for landscape shots, sunrise and sunset, and environmental portraits that show animals in their habitat.
- Mid range zoom (24 to 70mm): Good for photos around the lodge and for wider animal shots when you are close.
Accessories
- Bean bag or window mount: Essential for stabilizing your camera on vehicle window sills. Bean bags are quiet and easy to use.
- Extra batteries: Cold temperatures and heavy use can drain batteries quickly. Bring at least 3 to 4 fully charged batteries.
- Memory cards: Bring at least 128GB of storage, preferably spread across multiple cards. You will take thousands of photos.
- Lens cleaning kit: Dust is everywhere on safari. Bring a blower, brush, microfiber cloths, and lens cleaning solution.
- Rain cover for your camera: Essential for the wet season and for boat cruises where spray can be an issue.
Camera Settings for Wildlife Photography
Proper settings are a core part of any Wildlife photography tips guide. Here are the recommended settings for different situations:
Shutter Speed
Use a fast shutter speed to freeze animal movement. For stationary animals, 1/250 second is sufficient. For walking animals, use 1/500 second. For running animals or birds in flight, use 1/1000 second or faster. The exception is when you want to show motion blur, such as a running cheetah with a slow panning shot.
Aperture
Use a wide aperture (low f number) to blur the background and make your subject stand out. For portraits, f/2.8 to f/5.6 works well. For groups of animals or landscapes, use f/8 to f/11 to keep more of the scene in focus.
ISO
Increase your ISO to maintain fast shutter speeds in low light conditions. Modern cameras produce usable images at ISO 1600, 3200, or even higher. Do not be afraid to increase ISO; a sharp photo with some noise is better than a blurry photo with no noise.
Focus Mode
Use continuous autofocus (AI Servo on Canon, AF C on Nikon) for moving animals. Use single point autofocus and place the focus point on the animal eye for portraits. For gorilla trekking in dark forest, you may need to use manual focus.
Shooting Mode
Shoot in RAW format for maximum editing flexibility. RAW files contain more data than JPEGs, allowing you to adjust exposure, white balance, and recover shadows and highlights in post processing.
Composition Tips for Wildlife Photography
Focus on the Eyes
The eyes are the most important part of any wildlife portrait. Sharp eyes make the image engaging and compelling. Use single point autofocus and place the focus point on the eye. For gorillas and primates, eye contact creates a powerful connection with the viewer.
Use the Rule of Thirds
Place your subject off center using the rule of thirds grid. This creates a more dynamic and interesting composition than centering the subject. Leave space in the direction the animal is looking or moving.
Get Low
Shoot from eye level with your subject for more intimate and powerful images. If you are in a vehicle, use a bean bag on the window sill to stabilize your camera at a lower angle. For ground level shots, consider lying down if it is safe to do so.
Include the Environment
Environmental portraits that show the animal in its habitat tell a more complete story. Use a wider lens or step back to include the landscape. The golden grasses of the savannah, the misty mountains of the gorilla forest, or the acacia trees at sunset all add context and atmosphere.
Lighting for Safari Photography
Golden Hour
The best light for wildlife photography is during the golden hours: the first hour after sunrise and the last hour before sunset. The light is warm, soft, and creates long shadows that add depth to your images. Plan your game drives to be out during these times.
Avoid Midday Light
Midday light is harsh, creates unflattering shadows, and washes out colors. If you are out during midday, look for animals in shade or use the harsh light creatively for high contrast black and white images.
Overcast Days
Cloudy days provide soft, even light that is excellent for wildlife photography, especially in forests. The lack of harsh shadows makes exposure easier and brings out details in fur and feathers.
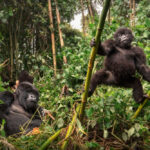
Special Situations: Gorilla Trekking Photography
Gorilla trekking presents unique challenges for photographers. Here are specific tips for your Wildlife photography tips guide:
- No flash allowed: Flash distresses gorillas and is strictly prohibited. Your camera will be checked at the briefing.
- Use high ISO: The forest is dark, and you cannot use flash. Increase your ISO to 1600, 3200, or higher to maintain fast shutter speeds.
- Use a fast lens: A lens with f/2.8 or wider aperture lets in more light and allows faster shutter speeds.
- Stabilize your camera: Use image stabilization on your lens or camera body. Brace yourself against a tree or your knee for support.
- Focus on the eyes: The gorillas eyes are what make the portraits compelling. Nail the focus on the eyes.
- Protect your gear: The forest is humid and can rain unexpectedly. Use a rain cover and lens cloth to keep your gear dry and clean.
Ethical Photography Practices
An important part of any Wildlife photography tips guide is ethical behavior. Follow these guidelines:
- Never use flash with gorillas, chimpanzees, or any wildlife
- Do not bait or lure animals for photos
- Stay in the vehicle unless in designated walking areas
- Do not approach animals closer than the legal minimum distance
- Do not share location data of endangered species online
- Do not disrupt animal behavior for a photo
Frequently Asked Questions
What lens do I need for gorilla trekking?
A 70-200mm f/2.8 or 100-400mm f/4.5-5.6 is ideal for gorilla trekking. The faster aperture of the 70-200mm is better for dark forest conditions, but the 100-400mm gives you more reach.
Can I bring a tripod on safari?
Tripods are not practical for game drives because there is no space to set them up in the vehicle. Use a bean bag on the window sill instead. Tripods can be useful for gorilla trekking if you are willing to carry the weight, but a monopod is a better option.
Should I shoot in RAW or JPEG?
Shoot in RAW for maximum editing flexibility. RAW files contain more data than JPEGs, allowing you to adjust exposure, white balance, and recover shadows and highlights in post processing.
How do I keep my gear clean on safari?
Dust is everywhere on safari. Use a blower and brush to remove dust from your camera and lenses. Avoid changing lenses in dusty conditions. Use a rain cover during the wet season.
Final Thoughts
Applying a Wildlife photography tips guide will dramatically improve your safari images. Practice with your gear before you go, understand your camera settings, and be patient. The best wildlife images come to those who wait. Respect the animals, follow the rules, and you will come home with photos that tell the story of your incredible African adventure.